Teak Yacht Cockpit Tables

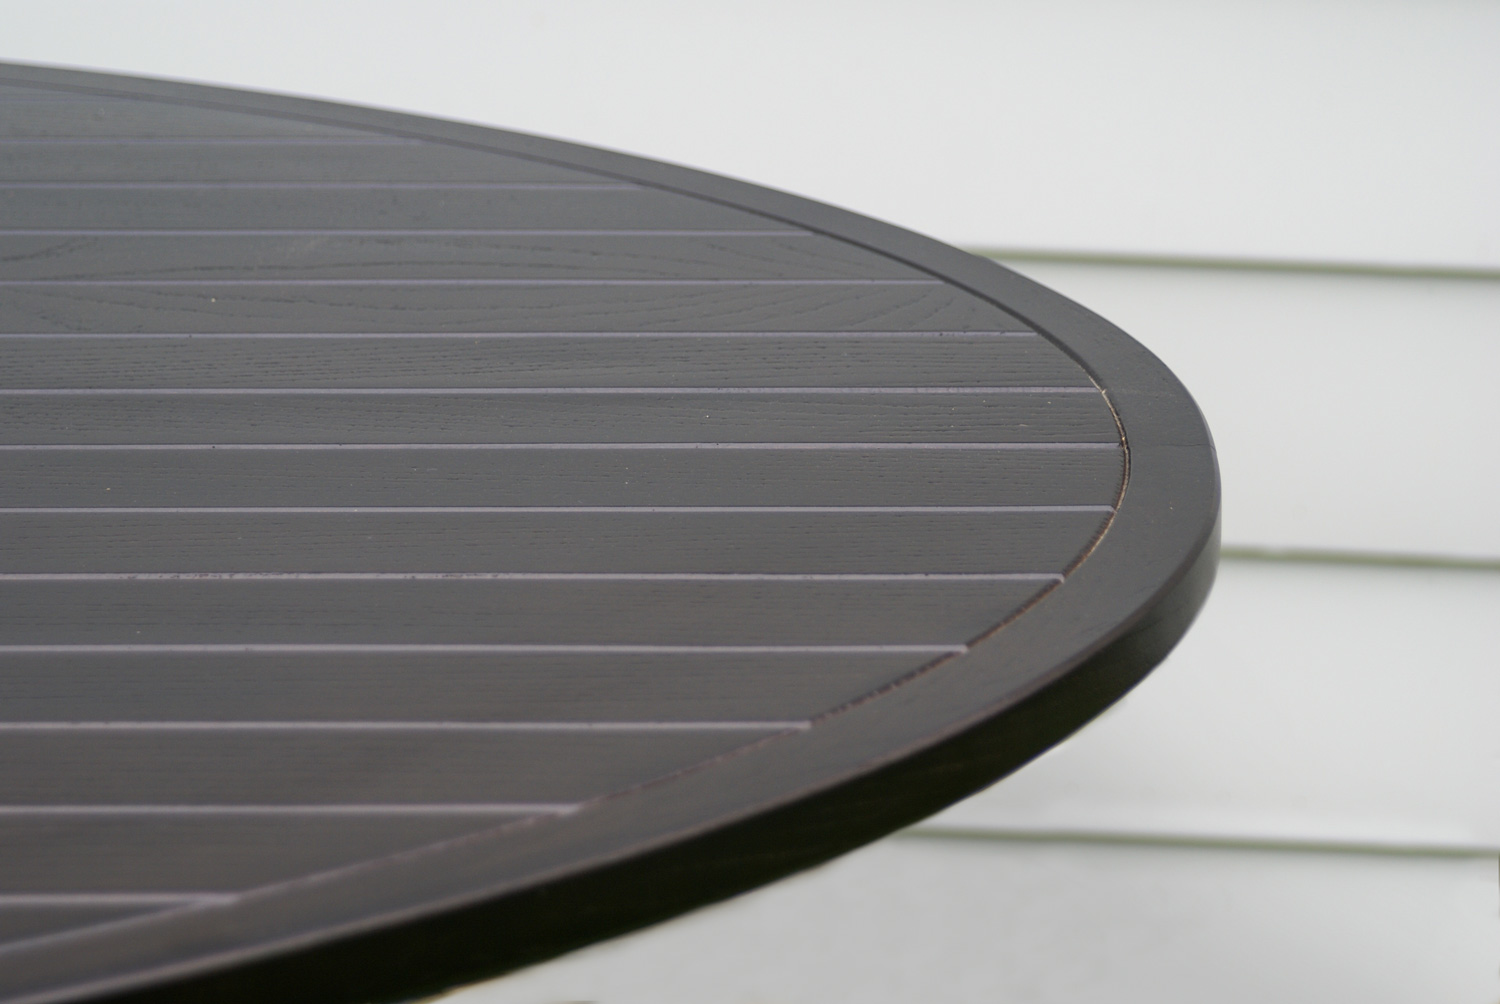
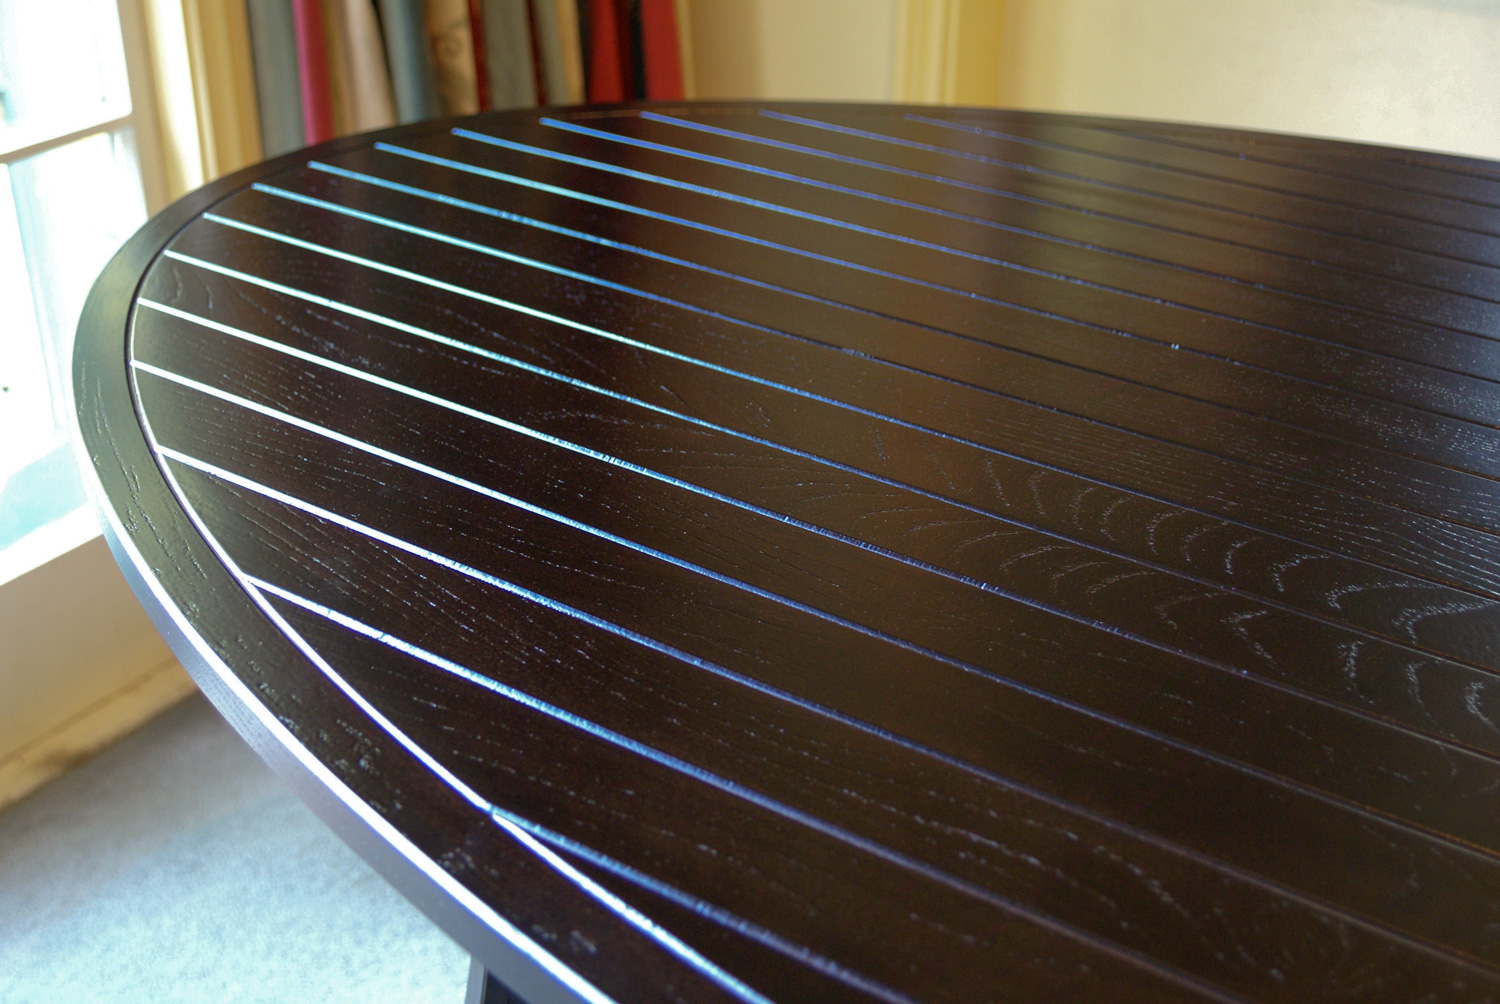
I was asked to make two folding cockpit tables for a large yacht that was being built. I was supplied with detailed drawings by a well-known yacht designer. These drawings were very detailed and I had to follow them closely. The timber is teak, which is done as a veneer in a herring bone pattern over a light weight plywood base. I had to cut my own veneers as the standard veneers are too thin for something like this. The darker timber that makes a pattern around the edge is called wenge. The outside edge is solid teak.

teak_cockpit_table_flat.jpg

It took quite a long time to lay the veneers in the herring bone pattern, making sure that the grains flowed from the folding section onto the main part. The whole project is then finished with a high gloss marine finish.

teak_cockpit_table_detail.jpg

When the boat goes to sea, you fold the ends in, which makes the tables smaller and easier to get around. There is also a fiddle around the edge when folded, which stops things sliding off when the boat rolls at the sea.

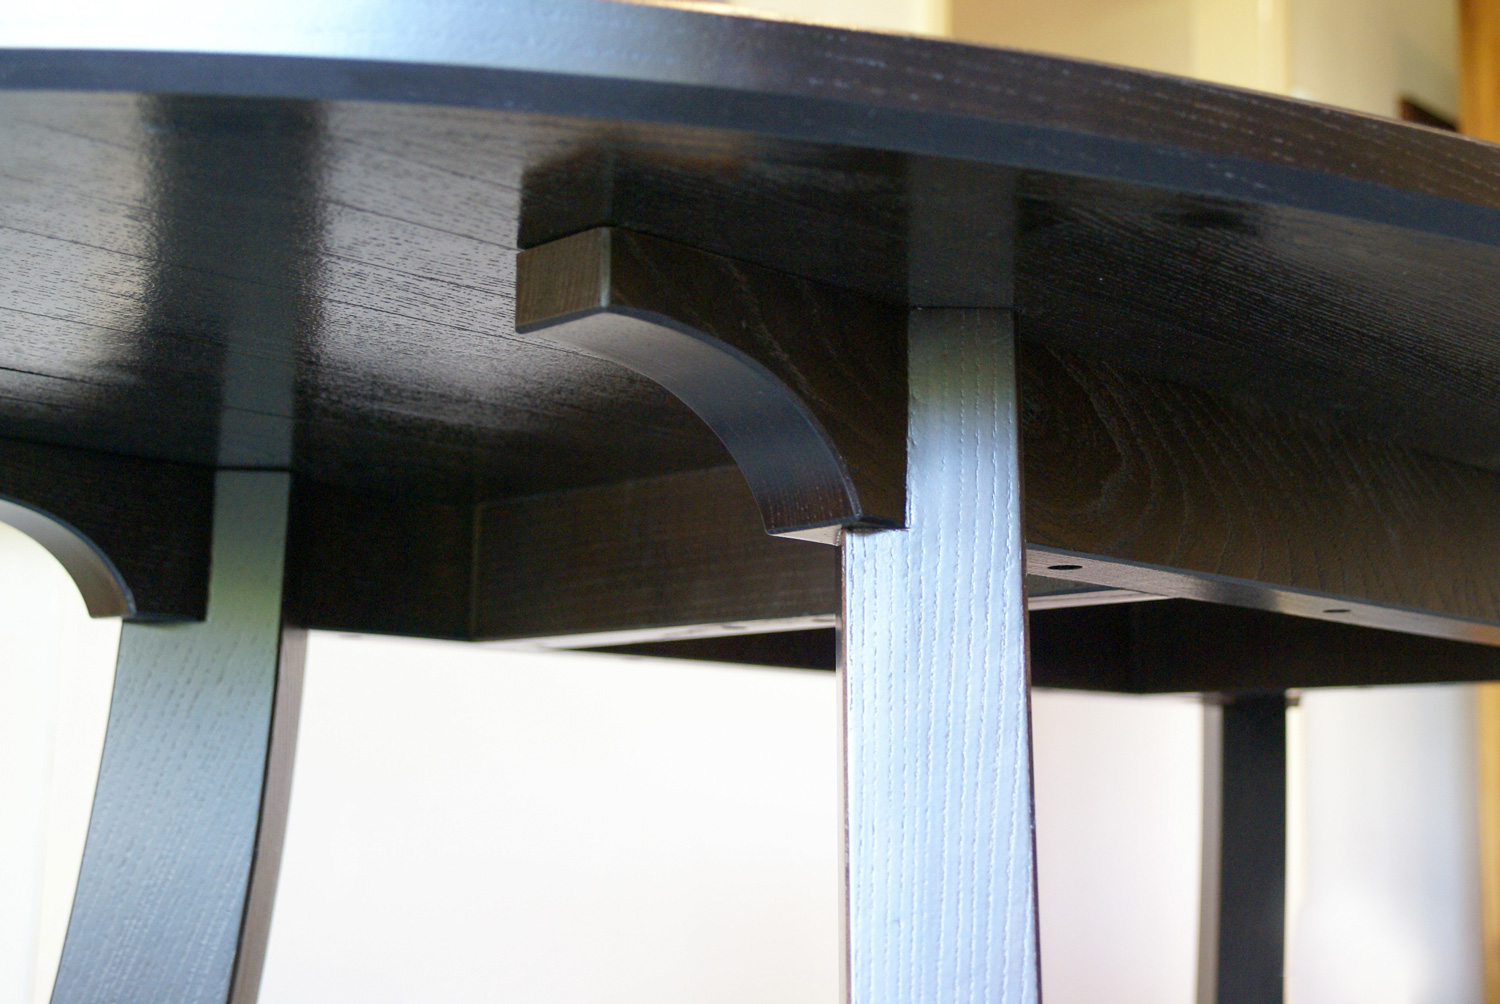
The table tops will mount on pedestals which are made from aluminium and fibreglass.

One end of the table folded up.

One end of the table folded up.

Both ends folded up for when the boat is at sea.

Both ends folded up for when the boat is at sea.


Runabout Restoration

I had some people contact me about the restoration of their 1960’s runabout. It had a nice mahogany deck that needed some repair work and the boat needed a paint job. So they brought the boat to me and we loaded it into the workshop and I began work on the deck.

Click the image above to see more before photos.

Click the above image above to see more process photos on the deck.

They also mentioned there was a bit of a leak, and if I could fix that it would be good. When I began looking for the leak my screwdriver went right though the bottom of the boat. I sent a text with a photo. It’s bad. Do you want me to proceed? Yes.

We discovered that the leak was due to significant rotting in the floor of the boat.

We discovered that the leak was due to significant rotting in the floor of the boat.

A good-sized section of the bottom of the boat had to be replaced. Framing included a section of the stem (the framing for the bow), the keelson and ribs along the bottom all had to be replaced. I tipped the boat on its side so that I could work from the top and the bottom at the same time. The framing had to be done one part at a time to retain the shape of the boat, then new ply attached. Now I could put the boat fully upside down to fair it off, and firbreglass it, and finally paint it.

Click the image to see more progress photos.

Once I had it back upright again, I was able to finish work on the deck, dashboard and floorboards. Parts of the deck had lifted or cracked and had to be replaced, everything sanded down. Paint and varnish followed. Then everything had to be put back. The framing for the seats was completely riddled with borer, so had to be replaced and then re-upholstered. The floorboards refitted, steering and various cables which even a small boat like this has, put back in place. Ready for the water again.

Painting the interior.

Painting the interior.

blog_dodds_restoration_afer_1.jpg
blog_dodds_restoration_afer_2.jpg
blog_dodds_restoration_afer_3.jpg
blog_dodds_restoration_afer_4.jpg
blog_dodds_restoration_afer_6.jpg
blog_dodds_restoration_afer_8.jpg
blog_dodds_restoration_afer_7.jpg
blog_dodds_restoration_afer_9.jpg
Chris and the owner with the finished boat.

Chris and the owner with the finished boat.

It was great to get some space back in my workshop, but also sad to see it go. It was a very satisfying project.

Watch the process photos and the day boat was taken out of the workshop below.


Creating the Floating Display Cabinet

For a while I have had an idea about a display cabinet in my head that somehow would be floating. The challenge then was how to make that actually happen. I couldn’t have it on wires from the sky, so I came up with the idea of a framework to suspend it from. I like to put curves in my work, which is a result of working on boats, and so my frame work developed in my mind. I wanted to use two different types of wood to distinguish the two separate parts of the work.

You can draw plans on a piece of paper but it is not until you make it in full size, and it comes to life that you can tell if you got it right or not. You can be the judge of that. This piece is also my homage to two men who have been a great influence on my work. 

In the early 1980’s, through the Guild of Woodworkers in Christchurch, I met a boatbuilder by the name of Lionel Jefcoate, who at the time had a boatbuilding business in Governors Bay. We became good friends and Lionel was something of a mentor to me. Sadly, Lionel passed away last year.

I was helping the family to sort out his timber, and they kindly gave me a little ash and walnut. I wanted to do something special with this wood, and I also had an exhibition coming up, and I had the idea of this display cabinet in my mind. The outer frame that holds up the small cabinet is made from walnut, while the cabinet is made from ash. It won the top woodworking award at the exhibition. I really enjoyed the freedom of creating a personal project.

The hinges are a type called knife hinges, made popular by famous American cabinet maker Jim Krenov. In fact, there is quite a bit of Krenov influence about the whole design. Like me he had a background as a boatbuilder, and liked to incorporate curves into his designs. His signature pieces were small cabinets on legs. I was lucky enough to meet him and attend a weekend workshop when he came to New Zealand many years ago.

Two men, both superb woodworkers, have influenced this piece.

blog_Floating-Cabinet-Front-Three-Quarter-3-RT.jpg
blog_Floating-Cabinet-Front-RT.jpg
blog_Floating-Cabinet-Front-Open-RT.jpg

Click image for further detail photos.

blog_Floating-Cabinet-Front-Three-Quarter-2-RT.jpg

Fresh from the shed! - Matai Wall Unit

Recently a couple got in contact with me and said they had some timber and they wanted me to make something with it. I visited them, and we worked out there would be enough of this timber to make a coffee table, a drinks cabinet and a mantle piece.

About twenty years ago they had a farm on the banks of the Ashburton River. There was a big flood after some particularly heavy rain and a large log was washed onto their property. With the aid of a bulldozer they recovered the log and, after removing the stones embedded in it, had it milled. It turned out to be Matai which is quite a rarity in these parts. They stacked it very carefully to allow air to circulate and built a shed around it to keep it dry. This meant that when we went to use it, almost all of the wood was in sound condition after being stacked for twenty years or so.

It has been a delight to work with this couple and their wood. Matai is a lovely wood to machine and work with, but difficult to sand due to the natural oils in the timber. When you get it right, it looks beautiful. I have been lucky enough to do this work.

The finished wall unit the day we delivered it to the client.

The finished wall unit the day we delivered it to the client.

work_occasional_watson-wall-unit-9.jpg

Click image for further detail photos.

Click image for further detail photos.

In situ in the clients home.

In situ in the clients home.


Oval Elm Dining Table

Sometimes it is tricky to make things look simple. It can be quite difficult to achieve that. This table is like that. To achieve a simple, uncluttered look, it had to have quite a complex joint for the table legs, and the table top had to be laminated so that it would not warp as it had very little support. There is an oriental influence to the design.

The finished stained table. Six seater elm dining table.

The finished stained table. Six seater elm dining table.

The first job was to cut out the components for the legs and framework of the table. Then came making the joints for the legs to the rails with a joint that was much more complex that you would normally have to do. This had to all be cut and shaped for the most part by hand. The cross rails were joined with a more conventional mortice and tenon type joint. Then I had to make up the top which was a laminated design of a layer of elm, then plywood, then another layer of elm. The outside edge (clashing) of the table was also laminated up from thin strips. This was to get the shape right and give it strength. I cut the shape for the jig on the CNC router and clamped up the clashing strip one quarter of the table at a time.

Progress shot of the leg join.

Progress shot of the leg join.

Click image for further detail photos.

The table was polished with a dark stain which was matched to a sample supplied by the customer. This was to match built in furniture.

Finished table showing curvature of the legs.

Finished table showing curvature of the legs.